Which Wax?

Which wax is best? Working at a candle supply company, we get asked this question nearly every day.  As with most things in life, there are a numerous factors to consider when answering this question.  If you are trying to decide which wax is best for you, you need to first identify the factors that are important to you.

Will you be making container candles or pillar candles? When making container candles, you want to select a wax that adheres to the glass.  Conversely, if you are making pillar candles, you will want to use a wax that shrinks a bit so that it easily comes out of the mold when it has cooled.

Are you using candle dye in your candles? If you want vibrantly colored candles, it is best to use a paraffin wax such as IGI4633.  You can also use our Golden Wax Soy waxes with candle dye, however it is more difficult to achieve bright colors with soy wax.

Is cost a factor?  Many people choose soy wax over other waxes, simply because the current retail price of soy wax is significantly lower than most other waxes.  Soy wax and all other natural waxes are vulnerable to price fluctuations due to environment factors, such as the recent drought that occurred in the southern US.  We are seeing prices go up now for soy wax due to the poor growing conditions many farmers experienced due to the drought.  But in spite of that, prices for soy wax are still significantly lower than most paraffin waxes.

Blended waxes are also a terrific option. Some candle makers will blend their own waxes, making a custom blend of wax that is unique to their business.  This is a wonderful option because you can take advantage of the characteristics of each type of wax.  Incorporating soy wax will help keep the cost down, and your wax will benefit from its clean-burning characteristics.  Using some paraffin in your wax will aid in hot and cold throw, glass adhesion, and help your candle hold vibrant color.  Incorporating a small amount of stearic acid into your blend will help raise the melting point of your wax, which can help protect it from the damaging effects of sitting in the heat (for example, when shipping candles or at summer time markets).

These are a few of the important things to consider before purchasing a wax.  Hopefully, this helps shed some light on the advantages of different waxes.  Be sure to read the product descriptions for whichever wax you choose, and remember to take the time to test every product for yourself.


So you want to make a container candle?!

Welcome to candle making!  Whether you are making candles for yourself or intending to sell them to others, candle making is a fun hobby and a creative outlet.  By making candles at home, you decrease the cost of the candles you love, have endless options of fragrance and color, and you can make personalized gifts for friends and family.

Materials Needed:

Beginner Candle Making Instructions:

  1. Protect your work surface with newspaper or something similar.
  2. Use the glue gun to place a small amount of glue on the bottom of the wick(s) and glue it to the center of each glass container. You can use a dowel or pencil to center the wick while the glue is hot.
  3. An 8 oz jelly jar holds approximately 5.4 oz by weight of wax each. Melt approximately 5.4 oz wax in a double boiler by placing the wax inside the included pouring pot and then placing it into a larger pot that has 1-2 inches of water in it. Heat the wax to 185 degrees F. NOTE: Be careful to prevent any water from getting into your wax!
  4. Once your wax has reached 180-185 degrees F, remove from heat and add candle dye if desired, stirring thoroughly but gently until melted. It may be necessary to slightly increase the temperature back to 180-185 degrees F to completely melt the dye.  We recommend chipping off small pieces of block dye and adding them slowly until you achieve the desired shade. Some people use the tip of a knife to break off a small chunk of dye, or you may also use a vegetable peeler to “shave” off a pinch of dye.
  5. Once dye has fully melted in the wax, add fragrance. Many candle makers use roughly 1 oz of fragrance per pound of wax (NOTE: the included wax can hold up to 1.5 oz of fragrance per pound of wax, so it is possible to scent more heavily if desired). So to make one 5.4 oz candle, add .5-.75 ounces of fragrance. (As you gain experience, you will want to begin weighing all of your ingredients. This will help you more precisely determine the amount of fragrance needed.)
  6. Slightly warm the glass containers that you will be pouring into by warming with a blow dryer (Some candle makers skip this step.)
  7. Once the wax cools to 130-140 degrees Fahrenheit, pour the wax slowly into the glass container. Stop pouring when the wax level meets the base of the neck of the jar. (Some waxes require different pouring temperatures, so be sure to read the product descriptions for your wax, and don’t be afraid to experiment with different temperatures.)
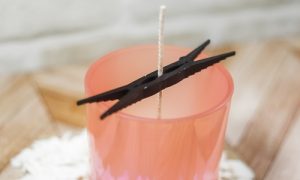
  8. Use a TruWik wick holder and center the wick within the grooved “teeth” of the device, and pull gently upward on the wick. Confirm that the wick is centered in the jar. Adjust if necessary. (Some people use wick bars, inexpensive hair combs, clothespins, chopsticks, or even pencils to center wicks.  You can conduct a YouTube search for these methods.)glass with wick and TruWik wick holder
  9. Allow the candle to cool for at least 24-48 hours. Trim the wick to 1/4 inch and make sure you trim the wick each time you light your candle for cleanest burn and best burn time.  Many candles are most fragrant after they have cured at least 48 hours, while some combinations of wax and fragrance may require longer cure-times.
  10. It may be necessary to slightly heat the top of the candle to smooth out the surface. You can do this with a hot hair dryer or a heat gun, but be sure to move your heat source continuously to avoid melting the wax coating on the wick.
  11. Be sure to place a warning label on the bottom of the container.

NOTE:  Never dispose of your wax down the sink or toilet. All waxes, including soy wax will clog your pipes.  To clean your tools, heat any wax with a hot hair dryer and wipe clean.  Once you have removed all wax, you can clean as your normally would with soap and water. It is recommended that items used to prepare candles be dedicated to candle-making and NOT be used in food preparation.